In the early 1920’s the Gilchrist Company out of Newark, New Jersey patented the design for a soda fountain era mixer – the Gilchrist No. 22. The operation is of the utmost simplicity with the plug acting as the on and off switch found on modern devices. For over a year my copy has flirted with my imagination and in late January of 2010 it was the center of a photo shoot. This is the end-to-end hybrid photo workflow from setup to print.
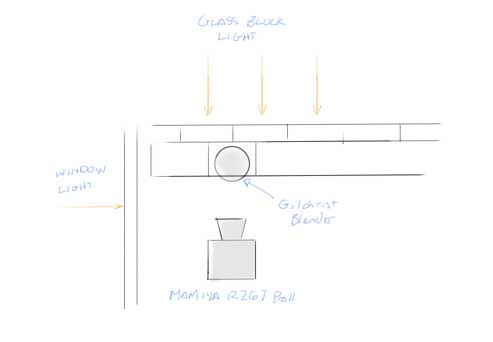
For the longest time my vision was to shoot the mixer like a product – white background, studio lighting, the works. For more interest I chose to use the glass block window in my dining room. It offered a second light source to the natural window light, back lighting the blender. Moreover, it offered a more structured grid pattern to juxtapose the curves of the mixer.

Photo shoot setup for Gilchrist No. 22
Equipment:
- Mamiya RZ67 ProII with Mamiya SEKOR-Z 110mm f2.8
- Ilford Delta 400; exposure compensation +1 at the meter; 2 sec exposures @ f8 / f5.6
- Tripod, double shutter release and bellows set to 110
Development:
- Pushed 1 stop with Ilford Ilfotech DD-X 1:4 using 4-6 inversions at the top of every minute
- Stop bath for 30sec
- Five minute fix using Ilford Rapid Fixer 1:4
- Water wash for 5 minutes
- Ilfotol rinse for 5 minutes
- Hang dry after film squeegee
- Cut in pairs and sleeves using lint free gloves
Scanning:
- Nikon 9000 ED
- NikonScan
- Scan Science wet scan
Seven of the ten shots were worth further review. About half needed considerable touch up to remove air bubbles caught by the fluid and film.
Lesson 1: Do not develop and then scan immediately. The film is not as flat as it should be causing the edges of the film to lift and air to form pockets.
Lesson 2: Slight surface tension, by applying tape to the edges of the glass and holder, can correct the introduction of bubbles.
The thin grip tape that lines the sides of the Nikon negative holder began the wrinkle, likely due to the slight overflow of Lumina from the mount. From what I can tell this did not have any effect on the scan, possibly do to the ability to focus the scanner. Regardless, the ripples seemed minimal and depressed with the weight of the glass mount.
Once the final scans were complete I imported them into Adobe Lightroom 2 as my digital negatives, performed basic adjustments and then edited the visual defects (dust, bubbles etc) in Adobe Photoshop. Adobe Lightroom 2 offers spot removal, but slows with the number of spots and does not do nearly as good a job as the healing brush in Photoshop. Finally, back in Lightroom to add the final polish.
As a test, I ordered 8×10 inch glossy prints on Fujicolor Crystal Archive paper. The images were exported as JPEG, highest quality, 300ppi and sent to myPhotopipe.com to get printed on their Noritsu or Chromira printers. The results were striking – the quality was superb and clearly much larger prints could be made with minimal quality loss. Another excellent activity for a follow-on post.
[slidepress gallery=’gilchrist-no-22′]
Great post. Thanks for sharing your workflow.
Thanks Markus. I had been meaning to post that for long time. A few months ago I realized as I published images it affected the way I registered for copyright. The simplest thing to do is register the unpublished works before publishing. Anyway, I am glad you enjoyed the post and there will be more like that one in the future.
[…] images off to be printed at places like myPhotopipe. For example, I got some samples done of the Gilchrist No. 22 and was impressed with the results, but ultimately have very little to compare with. The November […]